简介 在现代容器化应用开发中,Kubernetes 已成为主流的容器编排平台,为应用部署和管理提供了强大的功能。然而,随着应用规模和复杂性的增加,对于持久化存储的需求也日益迫切。在 Kubernetes 集群中,分布式存储解决方案如 GlusterFS 成为了许多开发者和运维人员的首选。本文将深入探讨 Kubernetes 运维中的分布式存储,重点介绍 GlusterFS 的原理、架构以及在 Kubernetes 中的实践应用。
GlusterFS 是一个强大的开源分布式文件系统,具有出色的横向扩展能力,能够轻松支持数 PB 的存储容量,并处理数千个客户端的请求。它的核心优势在于将来自多台服务器上的磁盘存储资源集成到单一的全局命名空间,为用户提供了高效的共享文件存储解决方案。
该分布式文件系统具有多项突出特点,包括高扩展性、高可用性、高性能以及可横向扩展等。与其他存储解决方案相比,GlusterFS 的设计中没有元数据服务器,因此整个服务不存在单点故障的隐患,为应用部署和运维提供了更高的稳定性和可靠性。
在安装 GlusterFS 环境时,需要满足一定的硬件和网络要求。
至少需要三个节点,分别命名为 storage1、storage2 和 storage3。 每个节点必须至少连接一个原始块设备,例如空的本地磁盘,以供 Heketi 使用。这些设备上不得存储任何数据,因为它们将由 Heketi 进行格式化和分区。简而言之,安装 GlusterFS 需要准备具备一定规格的硬件,并确保网络连接稳定。 Heketi Heketi (https://github.com/heketi/heketi),是一个基于 RESTful API 的 GlusterFS 卷管理框架,旨在简化 GlusterFS 集群的管理和操作。通过 Heketi,用户可以轻松地与各种云平台进行整合,利用其提供的 RESTful API,Kubernetes 可以直接调用 Heketi 来管理多个 GlusterFS 集群中的卷。 Heketi 的一个显著优点是其能够保证 bricks(数据存储单元)以及它们的副本在集群中的不同可用区之间均匀分布,从而提高了数据的可靠性和可用性。 GlusterFS集群部署 主机准备 主机名配置 1 2 3 [root@localhost ~]# hostnamectl set-hostname storageX X为1,2,3
IP配置 1 2 3 4 5 6 7 8 9 10 11 [root@localhost ~]# cat /etc/sysconfig/network-scripts/ifcfg-eth0 DEVICE=eth0 TYPE=Ethernet ONBOOT=yes BOOTPROTO=static IPADDR=10.1.1.6X NETMASK=255.255.255.0 GATEWAY=10.1.1.2 DNS1=119.29.29.29 X为0,1,2
主机名解析设置 1 2 3 4 5 6 [root@localhost ~]# cat /etc/hosts 127.0.0.1 localhost localhost.localdomain localhost4 localhost4.localdomain4 ::1 localhost localhost.localdomain localhost6 localhost6.localdomain6 10.1.1.60 storage1 10.1.1.61 storage2 10.1.1.62 storage3
主机间免密登录设置 在storage1主机操作,然后copy到其它主机即可。
1 2 3 4 5 6 7 8 9 10 11 [root@storage1 ~]# ssh-keygen -t rsa -q -f /root/.ssh/id_rsa -N '' [root@storage1 ~]# cd /root/.ssh [root@storage1 .ssh]# cp id_rsa.pub authorized_keys [root@storage1 .ssh]# ls authorized_keys id_rsa id_rsa.pub [root@storage1 .ssh]# cd .. [root@storage1 ~]# scp -r /root/.ssh storage2:/root [root@storage1 ~]# scp -r /root/.ssh storage3:/root
硬盘准备 查看硬盘 所有GlusterFS集群节点全部操作,仅在storage1主机演示操作方法。
1 2 3 4 5 6 7 8 9 [root@storageX ~]# lsblk NAME MAJ:MIN RM SIZE RO TYPE MOUNTPOINT sr0 11:0 1 4.4G 0 rom /mnt/cdrom nvme0n1 259:0 0 20G 0 disk ├─nvme0n1p1 259:1 0 200M 0 part /boot ├─nvme0n1p2 259:2 0 512M 0 part [SWAP] └─nvme0n1p3 259:3 0 19.3G 0 part / nvme0n2 259:4 0 20G 0 disk nvme0n3 259:5 0 20G 0 disk
格式化硬盘 1 2 3 4 5 6 7 8 9 10 [root@storageX ~]# mkfs.xfs /dev/nvme0n2 meta-data=/dev/sdb isize=512 agcount=4, agsize=6553600 blks = sectsz=512 attr=2, projid32bit=1 = crc=1 finobt=0, sparse=0 data = bsize=4096 blocks=26214400, imaxpct=25 = sunit=0 swidth=0 blks naming =version 2 bsize=4096 ascii-ci=0 ftype=1 log =internal log bsize=4096 blocks=12800, version=2 = sectsz=512 sunit=0 blks, lazy-count=1 realtime =none extsz=4096 blocks=0, rtextents=0
硬盘自动挂载准备 硬盘自动挂载准备 准备挂载目录 1 2 3 4 5 [root@storage1 ~]# mkdir /glustersdb [root@storage2 ~]# mkdir /glustersdb [root@storage3 ~]# mkdir /glustersdb
修改/etc/fstab文件实现自动挂载 1 2 3 4 5 6 7 8 9 10 11 12 13 14 15 16 17 18 19 20 [root@storageX ~]# echo "/dev/nvme0n2 /glustersdb xfs defaults 0 0" >> /etc/fstab [root@storageX ~]# cat /etc/fstab ...... /dev/nvme0n2 /glustersdb xfs defaults 0 0 # 挂载所有 [root@storageX ~]# mount -a # 查看文件系统挂载情况 [root@storageX ~]# df -h Filesystem Size Used Avail Use% Mounted on devtmpfs 476M 0 476M 0% /dev tmpfs 487M 0 487M 0% /dev/shm tmpfs 487M 7.6M 479M 2% /run tmpfs 487M 0 487M 0% /sys/fs/cgroup /dev/nvme0n1p3 20G 2.5G 17G 13% / /dev/sr0 4.4G 4.4G 0 100% /mnt/cdrom /dev/nvme0n1p1 197M 110M 88M 56% /boot /dev/nvme0n2 20G 33M 20G 1% /glustersdb tmpfs 98M 0 98M 0% /run/user/0
安全设置 firewalld设置 1 2 3 4 [root@storageX ~]# systemctl disable firewalld [root@storageX ~]# systemctl stop firewalld [root@storageX ~]# firewall-cmd --state not running
SELinux设置 所有主机均要修改,修改后,请重启系统让修改生效。
1 [root@storageX ~]# sed -ri 's/SELINUX=enforcing/SELINUX=disabled/' /etc/selinux/config
时间同步设置 1 2 [root @storageX ~] 0 */1 * * * ntpdate time1.aliyun.com
GlusterFS安装 YUM源准备 1 2 3 4 5 6 7 8 9 10 11 12 13 14 [root @storageX ~] [centos -gluster9 ] name=CentOS-\$releasever - Gluster 9 baseurl=https://mirrors.tuna.tsinghua.edu.cn/centos/\$releasever /storage/\$basearch /gluster-9 / gpgcheck=0 enabled=1 gpgkey=file:///etc/pki/rpm-gpg /RPM-GPG-KEY-CentOS-7 EOF [root @storageX ~] CentOS-Gluster-9 .repo linux.repo
GlusterFS安装 关于软件的依赖,待补充。
启动GlusterFS 服务 1 2 [root @storageX ~] [root @storageX ~]
GlusterFS集群配置 在GlusterFS集群storage1主机上添加storage2和storage3 2台主机。
1 2 3 4 5 6 7 8 9 10 11 12 13 14 15 16 17 18 19 20 21 22 23 24 25 26 27 28 29 30 31 32 33 34 35 36 37 38 39 40 41 42 43 44 45 [root@storage1 ~]# gluster peer probe storage2 peer probe: success. [root@storage1 ~]# gluster peer probe storage3 peer probe: success. # 查看GlusterFS集群状态 [root@storage1 ~]# gluster peer status Number of Peers: 2 Hostname: storage2 Uuid: 798cd635-7de1-4e72-b044-f75da964a1b9 State: Peer in Cluster (Connected) Other names: storage2 Hostname: storage3 Uuid: b6c31c74-9476-40d8-bf74-b672b6ea1cc8 State: Peer in Cluster (Connected) [root@storage2 ~]# gluster peer status Number of Peers: 2 Hostname: storage3 Uuid: b6c31c74-9476-40d8-bf74-b672b6ea1cc8 State: Peer in Cluster (Connected) Hostname: storage1 Uuid: de125449-fcd5-4672-a841-2c2e05f9b8cb State: Peer in Cluster (Connected) [root@storage3 ~]# gluster peer status Number of Peers: 2 Hostname: storage2 Uuid: 798cd635-7de1-4e72-b044-f75da964a1b9 State: Peer in Cluster (Connected) Other names: storage2 Hostname: storage1 Uuid: de125449-fcd5-4672-a841-2c2e05f9b8cb State: Peer in Cluster (Connected) # 移除集群节点 # gluster peer detach storage1
添加复制卷验证GlusterFS集群可用性 如果是为K8S集群提供持久化存储,请不要再继续验证GlusterFS集群可用性或验证完成后,重新添加硬盘。
在GlusterFS集群任意节点均可完成
创建复制卷
1 2 3 4 5 6 7 8 9 10 [root@storage1 ~]# gluster volume create k8s-test-volume replica 3 storage1:/glustersdb/s1 storage2:/glustersdb/s2 storage3:/glustersdb/s3 [root@storage1 ~]# ls /glustersdb s1 [root@storage2 ~]# ls /glustersdb s2 [root@storage3 ~]# ls /glustersdb s3
启动复制卷 1 2 [root @storage1 ~] volume start : k8s-test-volume : success
查询复制卷状态 1 2 3 4 5 6 7 8 9 10 11 12 13 14 gluster volume status k8s-test-volume Status of volume: k8s-test-volume Gluster process TCP Port RDMA Port Online Pid ------------------------------------------------------------------------------ Brick storage1:/glustersdb/s1 49152 0 Y 5683 Brick storage2:/glustersdb/s2 49152 0 Y 4931 Brick storage3:/glustersdb/s3 49152 0 Y 4671 Self-heal Daemon on localhost N/A N/A Y 5700 Self-heal Daemon on storage3 N/A N/A Y 4688 Self-heal Daemon on storage2 N/A N/A Y 4948 Task Status of Volume k8s-test-volume ------------------------------------------------------------------------------ There are no active volume tasks
如果某一个brick不在线会影响客户端挂载(可选) 设置后,可以允许volume中的某块brick不在线的情况
1 2 3 4 5 [root@storage1 glusterfs]# gluster volume set k8s-test-volume cluster.server-quorum-type none volume set: success [root@storage1 glusterfs]# gluster volume set k8s-test-volume cluster.quorum-type none volume set: success
限额问题(可选) 1 2 3 4 5 [root @storage1 ~] volume quota : success [root @storage1 ~] volume quota : success
在k8s集群工作节点验证GlusterFS集群可用性 由于仅使用一个工作节点验证GlusterFS集群可用性,因此没有必要为所有工作节点全部安装GlusterFS客户端。
准备YUM源 1 2 3 4 5 6 7 8 9 10 11 [root @k8s -node1 ~] [centos -gluster9 ] name=CentOS-\$releasever - Gluster 9 baseurl=https://mirrors.tuna.tsinghua.edu.cn/centos/\$releasever /storage/\$basearch /gluster-9 / gpgcheck=0 enabled=1 gpgkey=file:///etc/pki/rpm-gpg /RPM-GPG-KEY-CentOS-7 EOF
在k8s集群k8s-node1节点安装glusterfs 创建用于挂载目录 手动挂载GlusterFS集群中的复制卷 如果使用主机名挂载,storage1,storage2,storage3主机名需要添加到解析。
验证挂载情况 1 2 [root @k8s -node1 ~] storage1:/k8s-test-volume fuse.glusterfs 20 G 238 M 20 G 2 % /k8s-glusterfs-test-volume
验证完成后需要卸载 Heketi安装 Heketi 是一个用于管理和配置 GlusterFS 分布式文件系统的开源项目,Heketi的主要目标是简化 GlusterFS 的管理和配置。它提供了一个 RESTful API,使用户能够轻松地创建、调整和删除 GlusterFS 卷
k8s集群节点安装heketi 1 2 3 4 5 # master节点安装 [root@k8s-master ~]# yum -y install heketi heketi-client # 工作节点安装 [root@k8s-nodeX ~]# yum -y install heketi-client
在k8s集群master节点修改Heketi配置文件 在k8s集群master节点查看并备份文件,访问/etc/heketi/heketi.json,并修改
1 2 3 4 5 6 7 8 9 10 11 12 13 14 15 16 17 18 19 20 21 22 23 24 25 26 27 28 29 30 31 32 33 34 35 36 37 38 39 40 41 42 43 44 45 46 47 48 49 50 51 52 53 54 55 56 57 58 59 60 61 62 63 64 65 66 67 68 [root@k8s-master ~]# cp /etc/heketi/heketi.json{,.bak} [root@k8s-master ~]# ls /etc/heketi/ heketi.json heketi.json.bak # 修改配置文件 [root@k8s-master ~]# cat /etc/heketi/heketi.json { "_port_comment": "Heketi Server Port Number", "port": "18080", 修改为18080,防止与其它端口冲突 "_use_auth": "Enable JWT authorization. Please enable for deployment", "use_auth": true, 开启用户认证 "_jwt": "Private keys for access", "jwt": { "_admin": "Admin has access to all APIs", "admin": { "key": "wangxiansen" 用户认证的key }, "_user": "User only has access to /volumes endpoint", "user": { "key": "My Secret" } }, "_glusterfs_comment": "GlusterFS Configuration", "glusterfs": { "_executor_comment": [ "Execute plugin. Possible choices: mock, ssh", "mock: This setting is used for testing and development.", " It will not send commands to any node.", "ssh: This setting will notify Heketi to ssh to the nodes.", " It will need the values in sshexec to be configured.", "kubernetes: Communicate with GlusterFS containers over", " Kubernetes exec api." ], "executor": "ssh", 访问glusterfs集群的方法 "_sshexec_comment": "SSH username and private key file information", "sshexec": { "keyfile": "/etc/heketi/heketi_key", 访问glusterfs集群使用的私钥,需要提前在k8s集群master节点生成并copy到glusterfs集群所有节点,需要从/root/.ssh/id_rsa复制到此处才可以使用。 "user": "root", 认证使用的用户 "port": "22", ssh连接使用的端口 "fstab": "/etc/fstab" 挂载的文件系统 }, "_kubeexec_comment": "Kubernetes configuration", "kubeexec": { "host" :"https://kubernetes.host:8443", "cert" : "/path/to/crt.file", "insecure": false, "user": "kubernetes username", "password": "password for kubernetes user", "namespace": "OpenShift project or Kubernetes namespace", "fstab": "Optional: Specify fstab file on node. Default is /etc/fstab" }, "_db_comment": "Database file name", "db": "/var/lib/heketi/heketi.db", 数据库位置 "_loglevel_comment": [ "Set log level. Choices are:", " none, critical, error, warning, info, debug", "Default is warning" ], "loglevel" : "warning" 修改日志级别 } }
需要说明的是,heketi有三种executor,分别为mock、ssh、kubernetes,建议在测试环境使用mock,生产环境使用ssh,当glusterfs以容器的方式部署在kubernetes上时,才使用kubernetes。我们这里将glusterfs和heketi独立部署,使用ssh的方式。
配置ssh密钥 在上面我们配置heketi的时候使用了ssh的executor,那么就需要heketi服务器能通过ssh密钥的方式连接到所有glusterfs节点进行管理操作,所以需要先生成ssh密钥
1 2 3 4 5 [root@k8s-master ~]# ssh-keygen -t rsa -q -f /etc/heketi/heketi_key -N "" [root@k8s-master ~]# chown heketi:heketi /etc/heketi/heketi_key [root@k8s-master ~]# ssh-copy-id -i /etc/heketi/heketi_key.pub -p 22 root@10.1.1.61 [root@k8s-master ~]# ssh-copy-id -i /etc/heketi/heketi_key.pub -p 22 root@10.1.1.62 [root@k8s-master ~]# ssh-copy-id -i /etc/heketi/heketi_key.pub -p 22 root@10.1.1.63
启动Heketi 默认yum安装后,/etc/heketi及/var/lib/heketi目录所有者是root, 但是安装提供的service文件的user又是heketi. 导致不修改权限就是启动不起来,因此需要修改权限再启动服务。
1 2 3 4 5 6 7 [root@k8s-master ~]# chown heketi:heketi /var/lib/heketi -R [root@k8s-master ~]# systemctl enable --now heketi [root@k8s-master ~]# systemctl status heketi [root@k8s-master ~]# netstat -lnpt|grep 18080 tcp6 0 0 :::18080 :::* LISTEN 129861/heketi [root@k8s-master ~]# curl http://127.0.0.1:18080/hello Hello from Heketi
验证Heketi 1 2 3 4 5 6 7 # 验证是否可以创建集群 [root@k8s-master ~]# heketi-cli --user admin --secret wangxiansen --server http://10.1.1.100:18080 --json cluster create {"id":"5a4d590a19cc4e45d6af8c3b1342aac6","nodes":[],"volumes":[],"block":true,"file":true,"blockvolumes":[]} # 删除已创建的集群 [root@k8s-master ~]# heketi-cli --user admin --secret wangxiansen --server http://10.1.1.100:18080 --json cluster delete 5a4d590a19cc4e45d6af8c3b1342aac6 Cluster 5a4d590a19cc4e45d6af8c3b1342aac6 deleted
创建集群 1 2 [root@k8s-master ~]# heketi-cli --user admin --secret wangxiansen --server http://10.1.1.100:18080 --json cluster create {"id":"05b7bf1e0a438410d2627ccf0e4deefd","nodes":[],"volumes":[],"block":true,"file":true,"blockvolumes":[]}
添加节点 1 2 3 4 5 6 7 8 9 10 11 # 添加storage1 [root@k8s-master ~]# heketi-cli --user admin --secret wangxiansen --server http://10.1.1.100:18080 --j node add --cluster "05b7bf1e0a438410d2627ccf0e4deefd" --management-host-name 10.1.1.61 --storage-host-name 10.1.1.61 --zone 1 {"zone":1,"hostnames":{"manage":["10.1.1.61"],"storage":["10.1.1.61"]},"cluster":"05b7bf1e0a438410d2627ccf0e4deefd","id":"83b3050392766699b008395858b5bb7e","state":"online","devices":[]} # 添加storage2 [root@k8s-master ~]# heketi-cli --user admin --secret wangxiansen --server http://10.1.1.100:18080 --json node add --cluster "05b7bf1e0a438410d2627ccf0e4deefd" --management-host-name 10.1.1.62 --storage-host-name 10.1.1.62 --zone 1 {"zone":1,"hostnames":{"manage":["10.1.1.62"],"storage":["10.1.1.62"]},"cluster":"05b7bf1e0a438410d2627ccf0e4deefd","id":"cf4926509f052d07c3fd42ddfbcd11a2","state":"online","devices":[]} # 添加storage3 [root@k8s-master ~]# heketi-cli --user admin --secret wangxiansen --server http://10.1.1.100:18080 --json node add --cluster "05b7bf1e0a438410d2627ccf0e4deefd" --management-host-name 10.1.1.63 --storage-host-name 10.1.1.63 --zone 1 {"zone":1,"hostnames":{"manage":["10.1.1.63"],"storage":["10.1.1.63"]},"cluster":"05b7bf1e0a438410d2627ccf0e4deefd","id":"82d65702ed1f948a3ef8a699cdbd4907","state":"online","devices":[]}
注意: 这里需要修改集群的ID信息。每个集群ID都是不一样的。
1 2 3 4 5 # 查看集群中node列表 [root@k8s-master ~]# heketi-cli --user admin --secret wangxiansen --server http://10.1.1.100:18080 node list Id:82d65702ed1f948a3ef8a699cdbd4907 Cluster:05b7bf1e0a438410d2627ccf0e4deefd Id:83b3050392766699b008395858b5bb7e Cluster:05b7bf1e0a438410d2627ccf0e4deefd Id:cf4926509f052d07c3fd42ddfbcd11a2 Cluster:05b7bf1e0a438410d2627ccf0e4deefd
添加设备 错误的示范 1 2 3 [root@k8s-master ~]# heketi-cli --user admin --secret wangxiansen --server http://10.1.1.100:18080 device add --name "/dev/nvme0n2" --node 82d65702ed1f948a3ef8a699cdbd4907 Error: Setup of device /dev/nvme0n2 failed (already initialized or contains data?): Can't open /dev/nvme0n2 exclusively. Mounted filesystem? Can't open /dev/nvme0n2 exclusively. Mounted filesystem?
此次node的IP通过查询node列表获取
添加新硬盘 如果没有做使用测试,可以不操作此步骤。
1
2
3
4
5
6
7
8
9
[root@storageX ~]# lsblk NAME MAJ:MIN RM SIZE RO TYPE MOUNTPOINT sr0 11:0 1 4.4G 0 rom /mnt/cdrom nvme0n1 259:0 0 20G 0 disk ├─nvme0n1p1 259:1 0 200M 0 part /boot ├─nvme0n1p2 259:2 0 512M 0 part [SWAP] └─nvme0n1p3 259:3 0 19.3G 0 part / nvme0n2 259:4 0 20G 0 disk nvme0n3 259:5 0 20G 0 disk
添加GlusterFS集群节点中的设备到Heketi集群 1 2 3 4 5 6 7 8 [root@master01 ~]# heketi-cli --user admin --secret wangxiansen --server http://10.1.1.100:18080 device add --name "/dev/nvme0n3" --node 82d65702ed1f948a3ef8a699cdbd4907 Device added successfully [root@master01 ~]# heketi-cli --user admin --secret wangxiansen --server http://10.1.1.100:18080 device add --name "/dev/nvme0n3" --node 83b3050392766699b008395858b5bb7e Device added successfully [root@master01 ~]# heketi-cli --user admin --secret wangxiansen --server http://10.1.1.100:18080 device add --name "/dev/nvme0n3" --node cf4926509f052d07c3fd42ddfbcd11a2 Device added successfully
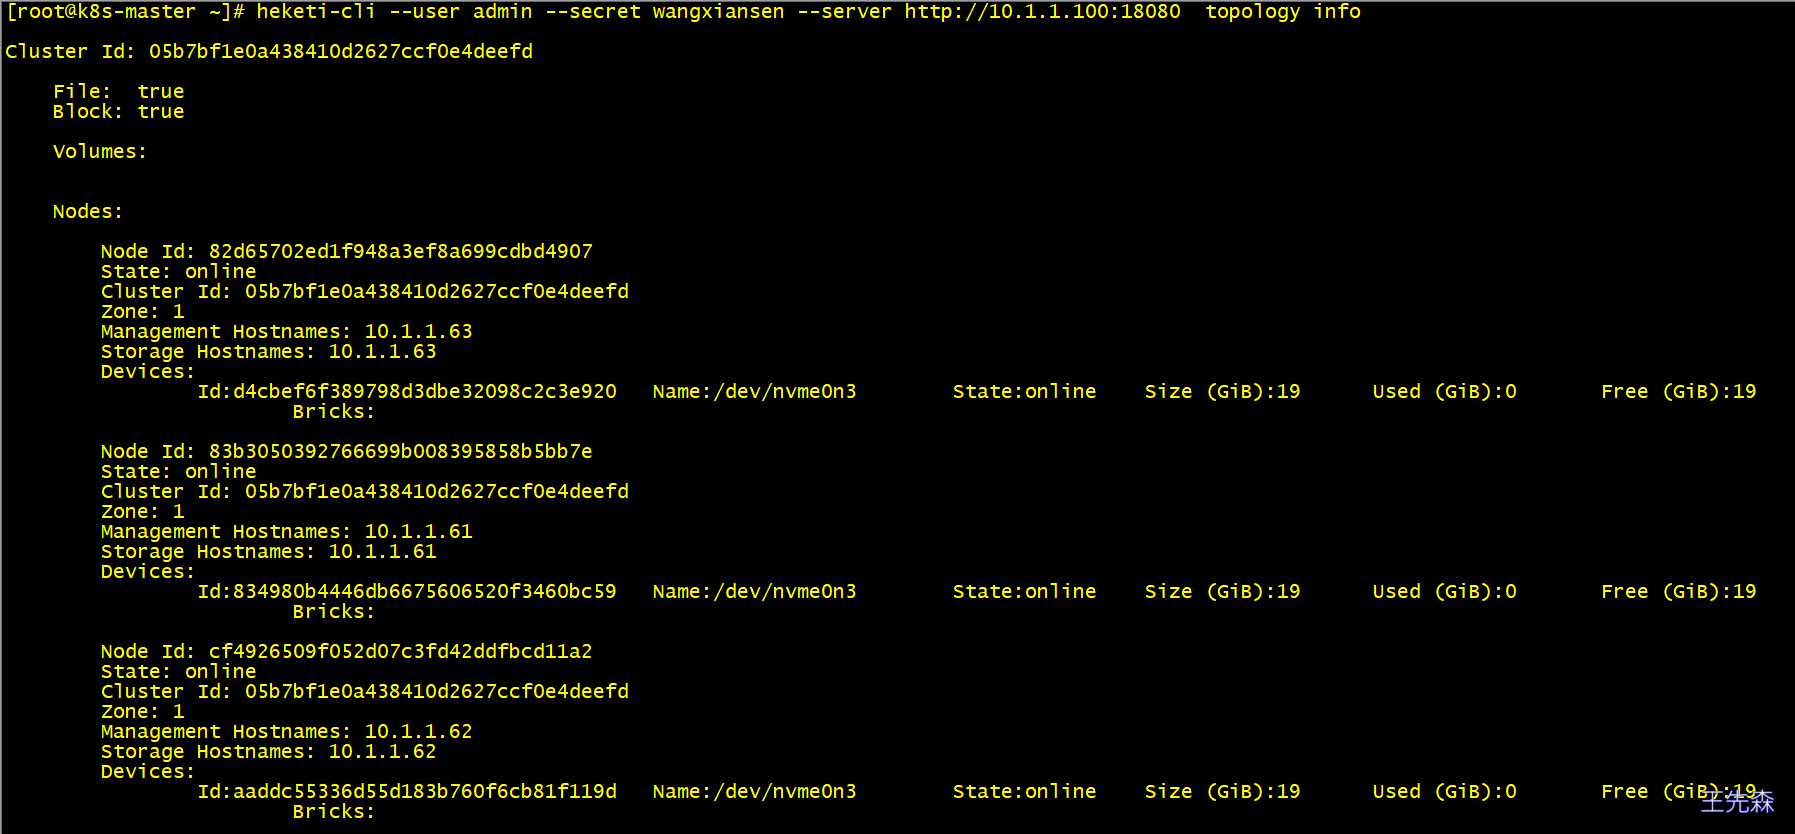
验证节点及设备添加情况 1 2 3 [root@master01 ~]# heketi-cli --user admin --secret wangxiansen --server http://10.1.1.100:18080 topology info 或 [root@master01 ~]# heketi-cli --user admin --secret wangxiansen --server http://10.1.1.100:18080 topology info --json
测试通过Heketi在GlusterFS集群中添加volume 在k8s集群master节点查看是否有volume 1 [root@k8s-master ~]# heketi-cli --user admin --secret wangxiansen --server http://10.1.1.100:18080 volume list
在k8s集群master节点创建volume 1 2 3 4 5 6 7 8 9 10 11 12 13 14 15 16 17 18 19 20 21 22 23 24 25 26 27 28 29 30 31 # 获取帮助 [root@k8s-master ~]# heketi-cli --user admin --secret wangxiansen --server http://10.1.1.100:18080 volume create -h # 创建一个复制卷,共5G大小。卷的名称自动生成。 [root@k8s-master ~]# heketi-cli --user admin --secret wangxiansen --server http://10.1.1.100:18080 volume create --size=5 --replica=2 Name: vol_d65ae8974ec01e6e739b4088682c502a Size: 5 Volume Id: d65ae8974ec01e6e739b4088682c502a Cluster Id: 05b7bf1e0a438410d2627ccf0e4deefd Mount: 10.1.1.63:vol_d65ae8974ec01e6e739b4088682c502a Mount Options: backup-volfile-servers=10.1.1.61,10.1.1.62 Block: false Free Size: 0 Reserved Size: 0 Block Hosting Restriction: (none) Block Volumes: [] Durability Type: replicate Distribute Count: 1 Replica Count: 2 # 验证卷是否创建 [root@k8s-master ~]# heketi-cli --user admin --secret wangxiansen --server http://10.1.1.100:18080 volume list Id:d65ae8974ec01e6e739b4088682c502a Cluster:05b7bf1e0a438410d2627ccf0e4deefd Name:vol_d65ae8974ec01e6e739b4088682c502a # 在GlusterFS集群节点中验证即可看到已创建的卷。 [root@storage1 ~]# gluster volume list k8s-test-volume vol_d65ae8974ec01e6e739b4088682c502a # 删除验证卷 [root@k8s-master ~]# heketi-cli --user admin --secret wangxiansen --server http://10.1.1.100:18080 volume delete d65ae8974ec01e6e739b4088682c502a Volume d65ae8974ec01e6e739b4088682c502a deleted
通过topology快速创建集群 删除k8s-test-volume 释放 /dev/nvme0n2 磁盘
1 2 3 4 5 6 7 8 9 10 11 12 [root@storage1 ~]# gluster volume stop k8s-test-volume Stopping volume will make its data inaccessible. Do you want to continue? (y/n) y volume stop: k8s-test-volume: success [root@storage1 ~]# gluster volume delete k8s-test-volume Deleting volume will erase all information about the volume. Do you want to continue? (y/n) y volume delete: k8s-test-volume: success [root@storage1 ~]# umount /dev/nvme0n2 [root@storage1 ~]# pvremove /dev/nvme0n2 --force Labels on physical volume "/dev/nvme0n2" successfully wiped. # 清除 XFS 签名 [root@storage3 ~]# wipefs -a /dev/nvme0n2 /dev/nvme0n2: 4 bytes were erased at offset 0x00000000 (xfs): 58 46 53 42
创建 /etc/heketi/heketi-topology.json,配置内容如下:
1 2 3 4 5 6 7 8 9 10 11 12 13 14 15 16 17 18 19 20 21 22 23 24 25 26 27 28 29 30 31 32 33 34 35 36 37 38 39 40 41 42 43 44 45 46 47 48 49 50 51 52 53 54 55 56 57 58 59 60 61 62 63 64 # 通过topology.json文件定义组建GlusterFS集群; # topology指定了层级关系:clusters-->nodes-->node/devices-->hostnames/zone; # node/hostnames字段的manage填写主机ip,指管理通道,在heketi服务器不能通过hostname访问GlusterFS节点时不能填写hostname; # node/hostnames字段的storage填写主机ip,指存储数据通道,与manage可以不一样; # node/zone字段指定了node所处的故障域,heketi通过跨故障域创建副本,提高数据高可用性质,如可以通过rack的不同区分zone值,创建跨机架的故障域; # devices字段指定GlusterFS各节点的盘符(可以是多块盘),必须是未创建文件系统的裸设备 cat > /etc/heketi/heketi-topology.json <<EOF { "clusters" : [ { "nodes" : [ { "node" : { "hostnames" : { "manage" : [ "10.1.1.61" ] , "storage" : [ "10.1.1.61" ] } , "zone" : 1 } , "devices" : [ "/dev/nvme0n2" ] } , { "node" : { "hostnames" : { "manage" : [ "10.1.1.62" ] , "storage" : [ "10.1.1.62" ] } , "zone" : 2 } , "devices" : [ "/dev/nvme0n2" ] } , { "node" : { "hostnames" : { "manage" : [ "10.1.1.63" ] , "storage" : [ "10.1.1.63" ] } , "zone" : 3 } , "devices" : [ "/dev/nvme0n2" ] } ] } ] } EOF
执行以下命令创建集群
1 2 3 4 5 6 7 [root@k8s-master ~]# heketi-cli --user=admin --secret=wangxiansen --server http://127.0.0.1:18080 topology load --json=/etc/heketi/heketi-topology.json Found node 10.1.1.61 on cluster 05b7bf1e0a438410d2627ccf0e4deefd Adding device /dev/nvme0n2 ... OK Found node 10.1.1.62 on cluster 05b7bf1e0a438410d2627ccf0e4deefd Adding device /dev/nvme0n2 ... OK Found node 10.1.1.63 on cluster 05b7bf1e0a438410d2627ccf0e4deefd Adding device /dev/nvme0n2 ... OK
K8S集群使用GlusterFS集群 k8s中的StorageClass用于定义和配置持久卷(Persistent Volume)的资源对象。StorageClass 提供了一种抽象层,使得管理员能够定义不同类型的存储和访问模式,并将其提供给应用程序开发人员使用。
1 2 3 4 5 6 7 8 9 10 11 12 13 14 [root@k8s-master glusterfs]# cat > storageclass-gluserfs.yaml <<EOF apiVersion: storage.k8s.io/v1 kind: StorageClass metadata: name: glusterfs provisioner: kubernetes.io/glusterfs #表示存储分配器,需要根据后端存储的不同而变更 parameters: resturl: "http://10.1.1.100:18080" #heketi API服务提供的URL,为k8s集群master节点IP clusterid: "05b7bf1e0a438410d2627ccf0e4deefd" # # Clusterid 必填 restauthenabled: "true" #可选参数,默认为"false",heketi服务开启认证时,必须设置为"true" restuser: "admin" #可选参数,开启认证时设置相应用户名 restuserkey: "wangxiansen" #可选,开启认证时设置密码 volumetype: "replicate:2" #可选参数,设置卷类型及其参数,如果未分配卷类型,则有分配器决定卷类型;如”volumetype: replicate:3”表示3副本的replicate卷,”volumetype: disperse:4:2”表示disperse卷,其中‘4’是数据,’2’是冗余校验,”volumetype: none”表示distribute卷 EOF
执行echo -n "mypassword" | base64,对上面配置的admin密码进行加密,并修改key值,以上将userkey明文写入配置文件创建storageclass的方式,官方推荐将key使用secret保存。
1 2 3 4 5 6 7 8 9 10 11 12 13 14 15 16 17 18 19 20 21 22 23 24 25 26 27 28 [root@master01 yaml]# cat > storageclass-gluserfs-secret.yaml <<EOF apiVersion: v1 kind: Secret metadata: name: heketi-secret namespace: default data: # base64 encoded password. E.g.: echo -n "mypassword" | base64 key: d2FuZ3hpYW5zZW4= type: kubernetes.io/glusterfs --- apiVersion: storage.k8s.io/v1 kind: StorageClass metadata: name: glusterfs provisioner: kubernetes.io/glusterfs parameters: resturl: "http://10.1.1.100:18080" clusterid: "05b7bf1e0a438410d2627ccf0e4deefd" restauthenabled: "true" restuser: "admin" secretNamespace: "default" secretName: "heketi-secret" # restuserkey: "wangxiansen" gidMin: "40000" gidMax: "50000" volumetype: "replicate:2" EOF
在k8s集群master节点应用上述资源清单文件 1 2 3 4 5 [root@k8s-master glusterfs]# kubectl apply -f storageclass-gluserfs.yaml storageclass.storage.k8s.io/glusterfs created [root@k8s-master glusterfs]# kubectl get sc NAME PROVISIONER RECLAIMPOLICY VOLUMEBINDINGMODE ALLOWVOLUMEEXPANSION AGE glusterfs kubernetes.io/glusterfs Delete Immediate false 102s
创建PVC的资源清单文件 1 2 3 4 5 6 7 8 9 10 11 12 13 14 [root @k8s -master glusterfs ] kind: PersistentVolumeClaim apiVersion: v1 metadata: name: glusterfs-nginx namespace: default spec: storageClassName: glusterfs accessModes: - ReadWriteMany resources: requests: storage: 2 Gi EOF
应用上述资源清单文件 1 2 3 4 5 6 7 8 kubectl apply -f glusterfs-pvc.yaml persistentvolumeclaim/glusterfs-nginx created [root@k8s-master glusterfs]# kubectl get sc glusterfs NAME PROVISIONER RECLAIMPOLICY VOLUMEBINDINGMODE ALLOWVOLUMEEXPANSION AGE glusterfs kubernetes.io/glusterfs Delete Immediate false 5m44s [root@k8s-master glusterfs]# kubectl get pvc glusterfs-nginx NAME STATUS VOLUME CAPACITY ACCESS MODES STORAGECLASS AGE glusterfs-nginx Bound pvc-b5122b36-75b2-4707-844a-2fea69ff8228 2Gi RWX glusterfs 63s
创建Pod时使用上述创建的PVC 1 2 3 4 5 6 7 8 9 10 11 12 13 14 15 16 17 18 19 # vim glusterfs-web-pod.yaml apiVersion: v1 kind: Pod metadata: name: glusterfs-web spec: volumes: - name: glusterfs-volumes persistentVolumeClaim: claimName: glusterfs-nginx containers: - name: glusterfs-web image: nginx:alpine ports: - name: web containerPort: 80 volumeMounts: - name: glusterfs-volumes mountPath: '/usr/share/nginx/html'
应用测试Pod,检测pod是否正常。
1 2 3 4 [root@k8s-master glusterfs]# kubectl apply -f glusterfs-web-pod.yaml [root@k8s-master glusterfs]# kubectl get pods glusterfs-web -o wide NAME READY STATUS RESTARTS AGE IP NODE NOMINATED NODE READINESS GATES glusterfs-web 1/1 Running 0 13s 172.17.130.22 k8s-node2 <none> <none>
验证挂载是否成功 1 2 3 4 5 6 7 8 9 10 11 12 13 14 15 16 17 18 19 20 21 22 23 24 25 26 27 28 29 30 31 # 查看GlusterFS集群数据存储位置 [root@k8s-master ~]# kubectl describe pv pvc-b5122b36-75b2-4707-844a-2fea69ff8228 .... Path: vol_2fc8fa400a832e135aeea4030381d1d4 ReadOnly: false Events: <none> # 在storage1节点 [root@storage1 ~]# gluster volume list vol_2fc8fa400a832e135aeea4030381d1d4 [root@storage1 ~]# gluster volume info vol_2fc8fa400a832e135aeea4030381d1d4 Volume Name: vol_2fc8fa400a832e135aeea4030381d1d4 Type: Replicate Volume ID: 46fe3424-6744-40f1-b2a0-9a71cadd461d Status: Started Snapshot Count: 0 Number of Bricks: 1 x 2 = 2 Transport-type: tcp Bricks: Brick1: 10.1.1.63:/var/lib/heketi/mounts/vg_c85017e7e3bcc5bc7f6016a98474cb28/brick_f20bf5faf2236833bc0f7472ba899ef0/brick Brick2: 10.1.1.61:/var/lib/heketi/mounts/vg_834980b4446db6675606520f3460bc59/brick_7eb0aa029af6890dd1cbd08857169d30/brick Options Reconfigured: user.heketi.id: 2fc8fa400a832e135aeea4030381d1d4 cluster.granular-entry-heal: on storage.fips-mode-rchecksum: on transport.address-family: inet nfs.disable: on performance.client-io-threads: off
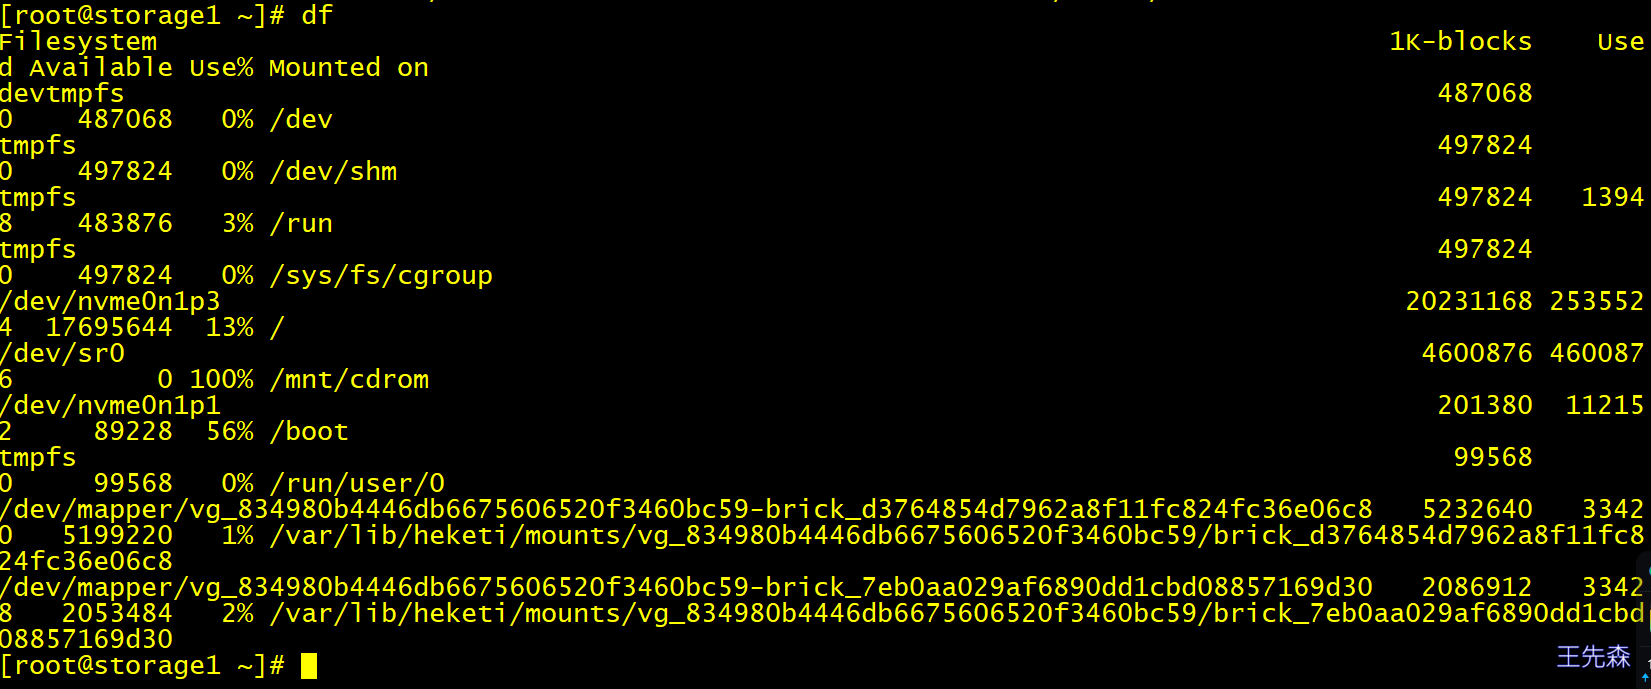
登录文件服务器,执行df -h查看挂载日志文件,如下所图
写入文件进行访问
1 2 3 4 5 6 7 8 9 10 # 在storage1节点写入文件 [root@storage1 ~]# echo -e "by wangxiansen\n分布式存储GlusterFSYYDS." > /var/lib/heketi/mounts/vg_834980b4446db6675606520f3460bc59/brick_7eb0aa029af6890dd1cbd08857169d30/brick/index.html [root@k8s-master glusterfs]# curl 172.17.130.22 by wangxiansen 分布式存储GlusterFSYYDS. # 在storage3节点,同时也会发现参加冗余校验存储系统中也存储这个文件 [root@storage3 ~]# ls /var/lib/heketi/mounts/vg_c85017e7e3bcc5bc7f6016a98474cb28/brick_f20bf5faf2236833bc0f7472ba899ef0/brick/index.html /var/lib/heketi/mounts/vg_c85017e7e3bcc5bc7f6016a98474cb28/brick_f20bf5faf2236833bc0f7472ba899ef0/brick/index.html
FAQ 问题 heketi有些卷明明存在但是却删不了/var/lib/heketi/ 下的mounts/文件夹,然后 > heketi.db 清空db文件,重新来。
Can’t initialize physical volume “/dev/nvme0n3” of volume group “vstorage1” without –ff
Error: Setup of device /dev/nvme0n3 failed (already initialized or contains data?): WARNING: xfs signature detected on /dev/nvme0n3 at offset 0. Wipe it? [y/n]: [n] Aborted wiping of xfs. 1 existing signature left on the device.
清除 XFS 签名:sudo wipefs -a /dev/nvme0n3


