Ansible自动化批量管理入门

Ansible自动化批量管理入门
王先森ansible服务概念介绍
- 是基于python语音开发的自动化软件工具
- 是基于SSH远程管理服务实现远程管理主机
- 批量管理多台主机
- 提高运维工作效率
- 降低运维工作难度
ansible批量管理特点
优点:
- 部署简单,只需在主控端部署Ansible环境,被控端无需做任何操作;
- 默认使用SSH协议对设备进行管理;
- 有大量常规运维操作模块,可实现日常绝大部分操作;
- 配置简单、功能强大、扩展性强;
- 轻链接、无需客户端(基于ssh,无需安装客户端,如zabbix的客户端要安装agent)
- 可读性强(采用YAML格式)
缺点:
- 对Windows系统的排斥(服务端无法安装在windows)
- 运行效率较低(task任务是串行运行;多台设备同事运行)
ansible批量管理部署
安装ansible
yum -y install epel-release
yum -y install ansible
ansible服务架构信息
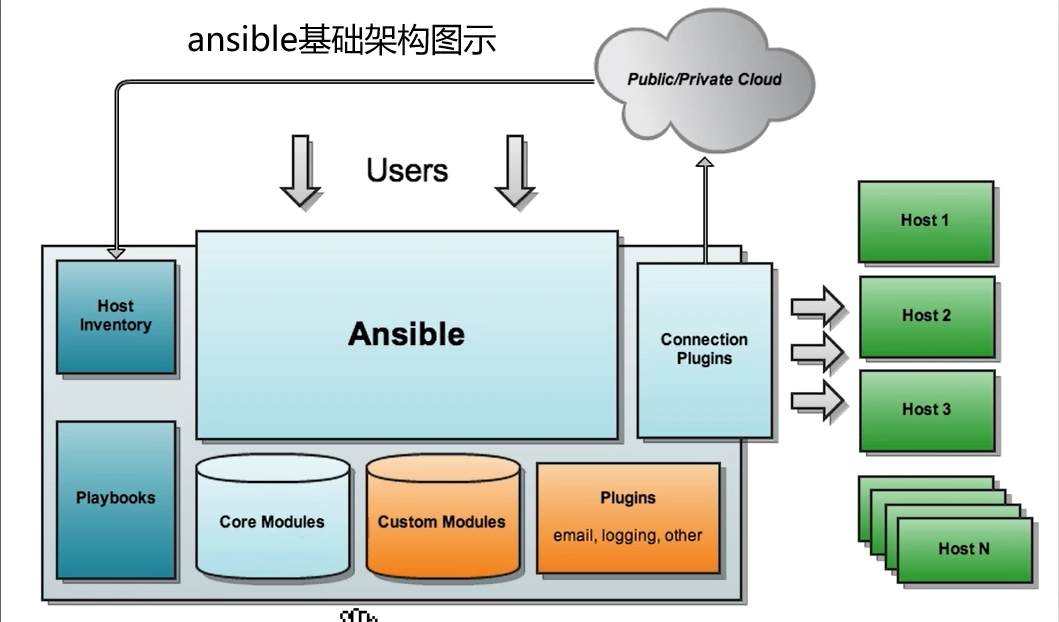
- 主机清单配置(inventory:默认文件:/etc/ansible/hosts)
- 软件模块信息(module 通过其他语言编写而成,能实现某个特定的功能的工具,例如思科配置接口的模块,修改ip地址的模块等等)
- 基于秘钥连接主机
- 主机需要关闭selinux –不然ansible连接其他主机会报错
- 软件剧本功能
配置ansible
/etc/ansible/hosts — 主机清单
/etc/ansible/ansible.cfg — ansible服务配置文件
/etc/ansible/roles — 角色目录
基于密码连接配置
编辑/etc/ansible/host
1 | 方法一 主机+端口+密码 |
基于秘钥连接
1 | 方法一 主机+端口+密钥 |
主机组
1 | 主机组变量名+主机+密码 |
关闭的HostKeyChecking
1 | The authenticity of host ‘10.1.1.13 (0.1.1.13)’ can’t be established. |
ansible连接新的host时会报错
修改下ssh的配置就可以了,当然,必须确定远程主机是可信任的
1 | vim /etc/ansible/ansible.cfg |
Inventory内置参数
完整的连接行为控制变量参见官方手册:How to build your inventory — Ansible Documentation。下面解释几个常见的行为变量。
| Inventory变量名 | 含义 | 例子 |
|---|---|---|
| ansible_host | ansible连接节点时的IP地址 | ansible_host=10.1.1.60 |
| ansible_port | 连接对方的端口号,ssh连接时默认为22 | ansible_host=22 |
| ansible_user | 连接对方主机时使用的主机名。不指定时,将使用执行ansible或ansible-playbook命令的用户 | ansible_user=boysec |
| ansible_password | 连接时的用户密码 | ansible_password=666666 |
| ansible_connection | 连接类型,有效值包括smart、ssh、paramiko、local、docker、winrm,默认为smart。smart表示智能选择ssh和paramiko,当SSH支持ControlPersist(即持久连接)时使用ssh,否则使用paramiko。local和docker是非基于ssh连接的方式,winrm是连接windows的插件 | ansible_connection=ssh |
| ansible_ssh_private_key_file | 指定密钥认证ssh连接时的私钥文件 | ansible_ssh_private_key_file=/home/boysec/.ssh/key |
| ansible_become | 允许进行权限提升 | ansible_become=true |
| ansible_become_method | 指定提升权限的方式,例如可使用sudo/su/runas等方式 | ansible_become_method=sudo |
| ansible_become_user | 提升为哪个用户的权限,默认提升为root | ansible_become_user=boysec |
| ansible_become_password | 提升为指定用户权限时的密码 | ansible_become_password=123456 |
| ansible_become_exe | 提升用户程序的路径 | ansible_become_exe=/usr/bin/sudo |
ansible命令
1 | [root@ansible ~]# ansible -h |
演示
1 | ansible webservers -m shell -a 'uptime' -o |
命令说明
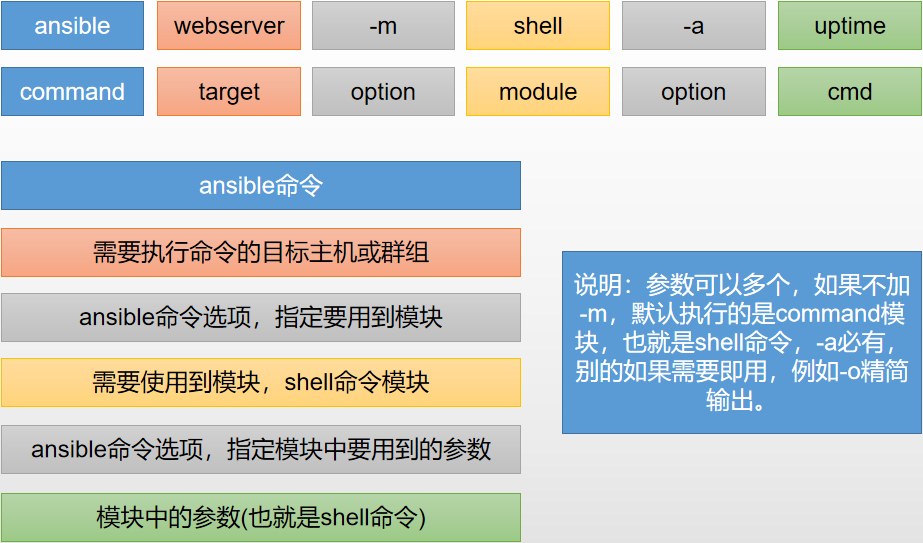
总结: ansible就是用什么模块,让谁干什么事情。


喜欢这篇文章的人也看了
评论
匿名评论隐私政策
✅ 你无需删除空行,直接评论以获取最佳展示效果